Wednesday, July 23, 2008

Peach Pie

Every year my mom and I make a trip out to Burg's Corner in Stonewall, TX to buy a half-bushel of peaches. It's kind of ridiculous because we never eat them all and end up giving most of them away. But the trip is always highly enjoyable, and it usually ends with a scoop of vanilla ice cream topped with peaches (didn't happen this time because I over did it earlier in the day with an organic canary melon... YUM!).

Like my last pie, I decided to use the ingredients available to me in my kitchen and make a peach pie. This time, I was going to make the ENTIRE crust from scratch, using the same dough recipe and I would also roll out the dough with a rolling pin. I also took inspiration from Pie Therapy again, making a few changes, like using less sugar.

Peach Pie


Preheat oven to 425 degrees.

Dough Recipe (make more if necessary... I had some leftover from the last recipe):
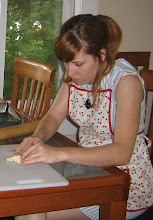
Cut 1 stick of butter into 1.5 cups of flour. Add 1/2 t. salt if butter is unsalted. Slowly work in 3-5 T. of ice water until desired consistency is reached. Roll out dough on lightly floured surface and place in greased pie dish. Cut off extra dough to use for top crust. You may either make a woven top or a decorative one (pictured above).

Filling:
Blanche, peel, and slice (removing pits and red centers of) 10-12 small peaches (should yield about 5 cups). Pour on 1/8 t. almond extract and squeeze on half of a key lime.

Mix with:
1/2 cup sugar (the original recipe calls for 3/4 cup, which I think is excessive)
3 T. flour (I might've accidentally used 4... I got distracted and lost count)
1/2 t. cinnamon
1/8 t. salt

Pour into crust and top with dough styling of your choice. Bake for 40 minutes or until crust is brown on the edges.

What I would do differently:
-Try using ginger to give it an extra kick (however, the flavor of the peaches was already amazing).
-The original recipe says to "Dot with 2 T. butter", which I didn't really understand, but now I know it's to give the crust a more golden-brown/toasted look and texture.

I think the next pie will be a chocolate pie of some sorts. I also have a lot of winter squash in my house, so I might try that...

Tuesday, July 1, 2008

Strawberry Blackberry Pie

Now is as good a time as any to start the blogging.

The other day, I watched the movie "Waitress", and enjoyed it immensely. There are several times in the movie where it could've taken a very cheesy turn, but the plot, the characters, and the humor are all done very well.

The best part?

PIE! Lots and lots of pie!

It was a lazy Sunday evening, we had two frozen Whole Foods pie crusts and a ton of strawberries and blackberries that were starting to turn. I determined that pie-making was in order. I Googled "strawberry blackberry pie" and came across the blog "Pie Therapy". The recipe was very simple, but I was a bit daunted by the fact that I'd have to make a top crust. I've never made pastry dough before. I also went to the grocery store looking for tapioca and couldn't find it anywhere (frankly, I didn't know what I was looking for and when I asked one of the HEB employees where it was, he pointed me to the water aisle... asshole!). When I got home, I found out that tapioca is used as a substitute for cornstarch, of which we had plenty. I also didn't feel like busting out the rolling pin, so I spread out the dough for the top crust with my hands across a large plate. It worked out pretty well. Check it out:


Strawberry Blackberry Pie

Preheat oven to 375*F.

Crust:
1 store bought crust (I like the Whole Foods frozen crusts; you can also double the crust recipe below to have a fully homemade crust on the top and bottom)

1 1/2 cups flour
1/2 teaspoon salt
1 stick of butter
1/3 cup of ice water in a pouring cup (NOT ALL OF IT WILL BE USED!)

Mix together flour and salt. Cut in butter until the mixture is nice and crumbly. Pour in ice water a tiny amount at a time, working the mixture into a dough with your hand. When enough water has been put in (1/4 cup will probably be all you need) to reach dough-like consistency, roll the dough out on a flat surface.

Filling:
3 cups strawberries, rinsed and sliced
1 cup blackberries, rinsed and drained on paper towels
3/4 cup sugar
1/4 cup cornstarch or tapioca
(for kicks, I threw in a tablespoon of Ficoco, a chocolate fig spread; fun, but unnecessary)

Place strawberries and blackberries in a large bowl. In a separate container, mix together sugar and cornstarch. Mix in with berries until sugar and starch become gel-like. Pour filling into pie crust and cover with dough for top crust. If dough is leftover (which there will be, trust me), use it to make a fun shape for the top of your pie.

Bake for 45 minutes. Serve hot. Store leftovers in the fridge and reheat with toaster oven or microwave.

What I'll do differently next time:
-Use less sugar. It's very sweet and not very tart, so less sugar would be helpful.
-Use a rolling pin to flatten out the dough. Also, make a double recipe of the dough for a homemade top and bottom crust.

Tuesday, April 1, 2008

Little Black Dress #1 - Simplicity Pattern

So the very first dress I sewed was in my second sewing class ever. The theme was "Audrey Heburn's Little Black Dress". I learned how to do princess seams, line a bodice, gather a skirt, create french seams, and put in a hem.

Many people in the class decided to go with another color or print, but I decided to stick to the theme and go with a black rayon sateen for the main part of the dress because it was shiny and use black cotton voile to line the bodice because it would be more comfortable. The class took place on two Saturdays and each day was 6 hours. The dress was completed by the end except for the hem, which I put in a month or two later.

Here it is!


Not too shabby, eh? It certainly helped that my mom sewed the majority of the princess seams outside of class (which I was supposed to do for homework between the two Saturdays). I was super afraid of doing princess seams ever again until I created the Steampunk Vest, where I learned that I much preferred having the convex/middle piece facing up as I could more easily observe/control the fabric "bubbles" that are created when pinning the two pieces together. When I had them facing down, all hell broke lose and the princess seams came out lumpy, and I got increasingly frustrated every time I had to reach for my seam ripper.

Lesson #1: Princess seams are hella easy when the convex side piece is facing up and you don't trust the feed dogs to do the work for you. Also, moms who know how to sew and are willing to teach you RULE.

Because the class itself was strapped for time, we didn't exactly learn how to cleanly attach a lined bodice to a skirt. If you can tell in the photo above, there is a weird bulge in the waist in the fabric. That's because there is a large mass of fabric all shoved together on the inside (three layers, one of them gathered). I later learned while sewing the Carrot Dress that it's super easy to tuck the skirt in between the bodice and lining and have the lining fold in nicely so there's no fabric/stitches poking you in the stomach.

Lesson #2: While it's easier and faster to sew the bodice, lining and skirt all on top of each other, it doesn't take that much more effort to tuck the skirt into the bodice/lining. Also, it looks nicer and is way more comfortable.

Gathering a skirt is, for the most part, pretty easy. This skirt proved a little more difficult, though, as the rayon sateen was super thick and kinda stiff. Also, it turned out kinda lumpy looking (see photo above) because the outside gathering stitch was sewn inside the seam line.

Lesson #3: Use lighter weight fabrics for gathered skirts and sew the outside gathering stitch right along the seam line. If the gathering stitch gets exposed, use a seam ripper to remove.

French seams: Easiest, most awesome seam ever. I use them all the time now, except on side seam pockets (but I might try them sometime and see if they work). I guess you could say that was "Lesson #4".

The hem was a bit weird because the skirt was already pretty short. The instructor suggested we use a roll-up hem, but it made the rayon sateen roll funny and it didn't sit right. Instead, I took out the second roll up and it looked fine. The hem stuck out in a few places and I fixed it using Web Stitch Witchery. A cheap trick, but one that worked. My mom wanted to show me a faced hem, but I didn't have enough fabric left for one (and also, I didn't really have the time to put one in).

Lesson #5: Roll up hems are not good with medium to heavy weight fabric. Also, Web Stitch Witchery works great on black garments.

Another lesson (#6) I learned very quickly is that there are different cutting layouts for different fabric widths. Because there was very little table space and many many people crowded together, I wasn't able to lay down all the pattern pieces at once. Also, with all the chaos in the room, I didn't realize that there were two pattern layouts for this dress and I started off by using the 45" layout when I was using 60". Oops. This led to me having to purchase more fabric, when I had already spent about $30 on it. Boo.

Another thing I learned that wasn't a lesson so much as a realization over the years is that the measurement between my bust and shoulders is about an inch shorter than what is normally used on patterns and store-bought garments. A closer look on this dress, you can see that the dress is actually sitting up off my shoulders. In the future, I will need to adjust patterns to make that space smaller, but also adjust the arm holes to remain the same size.

If I were to make this dress again, I would:

-put in pockets because I can now
-use a lighter weight fabric
-adjust the bust-to-shoulder space
-gather the skirt along the seam line and tuck the excess fabric between the bodice and lining
-used a faced hem